CI/CD With Github
Github Actions is a CI/CD tool that is built into Github. It is a great tool to get started. And it has ever growing plethora of actions. In this blog post i want to share with you how to create a CI/CD pipeline with Github Actions. And the example will be the very much this page you are reading right now. First lets go over the architecture we have for this website.
Architecture
This website relies on AstroJS and is hosted on AWS S3. The CI/CD pipeline will be triggered manually. The pipeline will build the website and deploy it to S3. The pipeline will also invalidate the CloudFront cache so that the changes are reflected immediately.
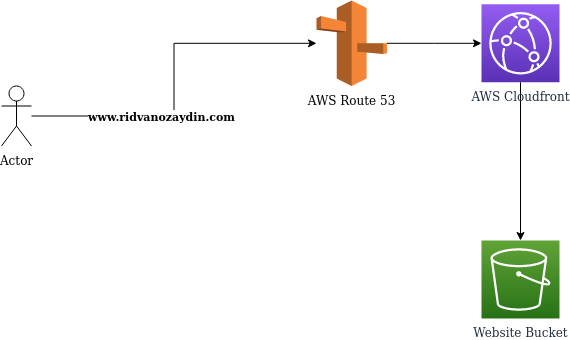
As you can see, nothing fancy here. It’s all well known classic static website hosting using AWS services. Now lets get into the details of the pipeline.
We want to achieve the following:
- When the manual deploy action is triggered on GitHub. The runner should assume a role in AWS using AWS STS (Security Token Service)
- This role should have the necessary permissions to copy the build artifacts in to S3 and invalidate the CloudFront cache
- The role should only have least privilege permissions and nothing more.
- Runner should be able to assume the role using the AWS credentials stored in GitHub secrets
The above part is what actually makes this blog (in my opinion) interesting. So in short we will need a user with no permissions except assuming a role. And we will have a role that has the necessary permissions to deploy the website. And we will have a GitHub action that will assume the role and deploy the website.
Creating the AWS User and The AWS Role
Below terraform code encapsulates the logic that we described above. It will create a user and a role. The role has only necessary permissions and nothing more. Further improvements can be applied such as restricting the role to only copy to specific S3 bucket and only invalidating specific cloudfront distribution.
# CI/CD Role for publishing web page and invalidating cloudfront cache
resource "aws_iam_role" "cicd_role" {

  name = "cicd-role"
  tags = var.tags

  assume_role_policy = jsonencode({
    Version = "2012-10-17"
    Statement = [
      {
        Action = [
          "sts:AssumeRole",
          "sts:TagSession"
        ]
        Effect = "Allow"
        Principal = {
          AWS = ["_use_your_aws_account_id_here_"]
        }
      }
    ]
  })

  inline_policy {
    name = "access_policy"
    policy = jsonencode({
      Version = "2012-10-17"
      # Cloudfront invalidation
      Statement = [
        {
          Action = [
            "cloudfront:UpdateDistribution",
            "cloudfront:DeleteDistribution",
            "cloudfront:CreateInvalidation"
          ]
          Effect   = "Allow"
          Resource = "*"
        },
        {
          # For uploading to S3
          Action = [
            "s3:DeleteObject",
            "s3:GetBucketLocation",
            "s3:GetObject",
            "s3:ListBucket",
            "s3:PutObject"
          ]
          Effect   = "Allow"
          Resource = "*"
        }
      ]
    })
  }
}

data "aws_iam_policy_document" "cicd_user_policy" {
  statement {
    effect = "Allow"
    actions = [
      "sts:AssumeRole",
      "sts:TagSession"
    ]
    resources = [aws_iam_role.cicd_role.arn]
  }
}

resource "aws_iam_user" "cicd_user" {
  depends_on    = [aws_iam_role.cicd_role]
  name          = "cicd-user"
  tags          = var.tags
  force_destroy = true
}

resource "aws_iam_user_policy" "cicd_user_policy" {
  name   = "cicd_policy"
  user   = aws_iam_user.cicd_user.name
  policy = data.aws_iam_policy_document.cicd_user_policy.json
}

resource "aws_iam_access_key" "cicd_user_access_key" {
  user = aws_iam_user.cicd_user.name
}
Please ensure you have the following lines in your outputs.tf file.
output "key_id" {
  value = aws_iam_access_key.cicd_user_access_key.id
}

output "key_secret" {
  sensitive = true
  value     = aws_iam_access_key.cicd_user_access_key.secret
}
Once you run the script please note the access key and secret key. We will need them in the next step.
terraform apply
terraform output -raw key_secret
Creating the Github workflow
Now that we have the AWS user and the role created. We can create the GitHub workflow. The workflow will be triggered manually. And it will assume the role we created in the previous step. Also please create following secrets in your repository.
- AWS_ACCESS_KEY_ID
- AWS_SECRET_ACCESS_KEY
- IAM_ROLE
- AWS_BUCKET
aws_access_key_id and aws_secret_access_key are the credentials of the user we created in the previous step. IAM_ROLE is the name of the role we created in the previous step. And AWS_BUCKET is the name of the S3 bucket that we will be deploying the website to.
And finally the workflow file ( you need to have it under .github/workflows folder ):
name: Deploy
on:
workflow_dispatch:
env:
AWS_REGION: eu-central-1
permissions:
contents: read
jobs:
deploy:
name: Deploy
runs-on: ubuntu-latest
strategy:
matrix:
node-version: [18.x]
steps:
- uses: actions/checkout@v3
- name: Use Node.js ${{ matrix.node-version }}
uses: actions/setup-node@v3
with:
node-version: ${{ matrix.node-version }}
cache: "npm"
- run: npm install
- run: npm run build --if-present
- name: Configure AWS credentials
uses: aws-actions/configure-aws-credentials@v2
with:
aws-access-key-id: ${{ secrets.AWS_ACCESS_KEY_ID }}
aws-secret-access-key: ${{ secrets.AWS_SECRET_ACCESS_KEY }}
role-to-assume: ${{ secrets.IAM_ROLE }}
role-session-name: cicd-session
aws-region: ${{ env.AWS_REGION }}
role-duration-seconds: 900
- name: Upload to S3 Bucket
# A local file will require uploading if the size of the local file is different than the size of the s3 object,
run: |
aws s3 sync ./dist s3://${{ secrets.AWS_BUCKET }}
- name: Invalidate Cloudfront Distribution
run: |
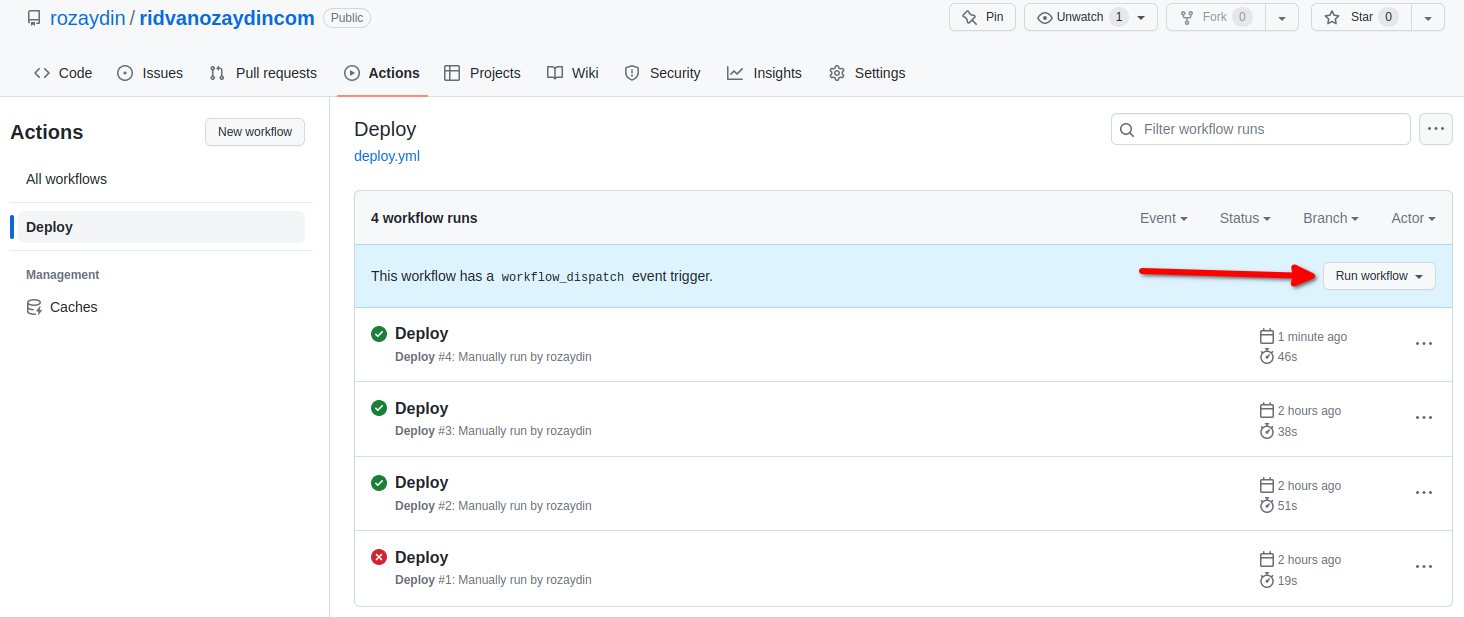
aws cloudfront create-invalidation --distribution-id ${{ secrets.AWS_DISTRIBUTION_ID }} --paths "/*"And that’s it. Here is what i see in my repository when i click on the actions tab.
Thanks for reading! And hope it can improve your daily workflow somehow.